My new blog

My blog has moved to www.davehunter.co.uk/blog see you there.
Showing posts with label Sticky. Show all posts

Friday, 3 August 2007

SharePoint 2007 Forms Authentication with Sql Server

Dan Attis has two great articles about configuring forms authentication against SQL Server with MOSS.

Part one - Configuring Forms Authentication with SharePoint
http://devcow.com/blogs/jdattis/archive/2007/02/23/Office_SharePoint_Server_2007_Forms_Based_Authentication_FBA_Walkthrough_Part_1.aspx

Part two - Configuring Forms Authentication with MySites
http://devcow.com/blogs/jdattis/archive/2007/03/01/Office_SharePoint_Server_2007_Forms_Based_Authentication_FBA_w_MySites_Walkthrough_Part_2.aspx
Points to note:

  • If you cant resolve your SQL users in the Central Administration you need to grant database access to the identity (user) that runs under the application pool account and make sure you have added Membership provider and Role Manager to the central administration web.config.
  • My deployment was configured intially for authentication with Active Directory. My SSP Admin site couldn't resolve the SQL users. I resolved this by creating a web application that extended the SSP Admin site to another port, setting the authentication to forms and specifying the Membership provider and Role Manager.

There's a useful tool on CodePlex for managing the Forms Based Authentication users in SharePoint, please see http://www.codeplex.com/fba

Tuesday, 31 July 2007

SharePoint 2007 Maximum Limitations

The following is a list of names and other parameters with the maximum allowable size of each


Entity
Max Permissible Size


Site Name
128 characters


Site URL
255 characters


Display name
128 characters


Connections diving
384 characters


Email address
128 characters


Version numbers
064 characters


Virtual Server Friendly Name
064 characters


SQL Database Name
123 characters


SQL Database Column
128 characters


SQL Database Table Name
128 characters


SQL Role Name
128 characters


Server Name
128 characters


Windows User Name
300 characters


Windows Password
300 characters


Dependencies per object
032 objects


Zone enumeration value
004 zones


Default SQL command timeout
300 seconds


Number of simultaneous workflows that can be run*
15


If during your course of using the product, you inadvertently cross these limits, then you would end up with errors. These are hard limits.

* This is the maximum number of simultaneous workflows that can be in memory executing code. (NOTE: there is no limit to the number of workflow instances in progress in the database)

Via
Harsh

Monday, 30 July 2007

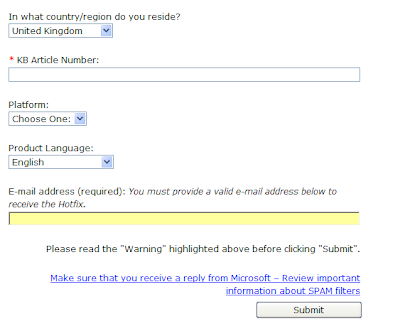
Get a hotfix without calling MS

You can now request hotfixes via the web. This saves time phoning up a MS customer service operator, explaining the problem, hot fix number and product the hot fix relates to.

Hotfixes that haven't been made public are also available.

Screen shot of the MS Hotfix Request Form


https://support.microsoft.com/contactus2/emailcontact.aspx?scid=sw;en;1410&WS=hotfix

Wednesday, 25 July 2007

Tip - Quickly find out an assembly's public key

When working with MOSS / WSS you need to find out the Public Key Token of your assembly for a feature, manifest or the web.config file.

One of the ways to retrieve the Public Key Token is to build the project (making sure the assembly is signed) and drop the assembly in the Global Assembly Cache (GAC).

You can however use the SN.EXE (.NET Strong Name Tool) with the -T parameter (please note the uppercase -T).

For example:
sn.exe -T MyAssembly.dll

Tuesday, 24 July 2007

SharePoint 2007 SQL Server Failure Audits in Event Log

Q. Are your event log's getting full of SQL Server Failure Audits for a service account or database access account you have created for MOSS?

Q. Have you also re-installed MOSS?

If you have answered yes to both of the above questions then you will have SQL Server Agent Jobs that are associated with old Shared Services databases running.

To resolve this

  1. Open SQL Server Management Studio.
  2. Expand SQL Server Agent.
  3. Expand Logs.
  4. Open the current log and look at the messages.
  5. You should see error messages like: Cannot open database "SharedServices3_DB" requested by the login. (see figure 1).
  6. Expand Jobs.
  7. You should see jobs named in the following format "[SSP]_[DB]_DeleteExpiredSessions" for example: SharedServices1_DB_Job_DeleteExpiredSessions" (see figure 2).
  8. Disable the jobs that don't relate to current Shared Services databases.
  9. Verify that the failure audits are no longer logged.
  10. Delete the disabled jobs.

Figure 1:


Figure 2:


Hope you find this helpful, it took ages to track the culprit down.

Wednesday, 18 July 2007

SharePoint 2007 Running SPSecurity.RunWithElevatedPrivileges

In SharePoint Portal Server 2003 you may have needed to impersonate a user with higher priveledges than the current user executing the code. You did this using WindowsIdentity.Impersonate() method. In SharePoint 2007 and WSS V3 you have SPSecurity.RunWithElevatedPrivileges call. The code looks like:

SPSecurity.RunWithElevatedPrivileges(delegate() {

// put your code here. any code within these curly brackets will run with SharePoint system rights

});
For more information see SPSecurity.RunWithElevatedPrivileges Method on MSDN.

Please note: If you use the SPControl.GetContextSite(this.Context) within the SPSecurity.RunWithElevatedPrivileges call or have an variable defined before the call this will use the current user's rights and not the system's. For example:

SPSecurity.RunWithElevatedPrivileges(delegate() {

using (SPSite site = SPControl.GetContextSite(this.Context))
{

// site will be based on the current user that executes this code

}


});

You should use:

SPSecurity.RunWithElevatedPrivileges(delegate()
{
using (SPSite site = new SPSite(web.Site.ID))
{


// site will be based on the rights for the system account

}

});
 

Adding web.config settings to you WSS or MOSS site

This article describes how to add web.config settings automatically to your new web applications under WSS V3 and SharePoint 2007.

You need to create a file in the format of webconfig.[name].xml, copy the file to C:\Program Files\Common Files\Microsoft Shared\web server extensions\12\CONFIG folder and the settings in the file will be merged with the web.config file on any new web application. Unfortunately this only works for new web applications, if you put the file in the config folder no changes will be applied on existing web applications.

The example below adds a key to the appSettings and a database connection string to the connectionStrings section.

<?xml version="1.0" encoding="utf-8" ?>
<actions>
<add path="configuration/appSettings">
<add key="MyFilePath" value="C:\temp\path\" />
</add>
<add path="configuration">
<connectionStrings />
</add>
<add path="configuration/connectionStrings">
<remove name="MySqlServerConnection" />
<add name="MySqlServerConnection" connectionString="server=[server];database=[db];Integrated Security=SSIP;" providerName="System.Data.SqlClient" />
</add>
</actions>

Blog tools - Colour code you C#, HTML or XML code

I found this great tool for formatting your code ready for your blog. http://www.manoli.net/csharpformat/.

Turns this:


<Elements xmlns="http://schemas.microsoft.com/sharepoint/">
<FeatureSiteTemplateAssociation Id="4DEFA336-EDC4-43cb-9560-FE2E27E76DFB" TemplateName="SPSPERS#0"/></Elements>

Into this:

<Elements xmlns="http://schemas.microsoft.com/sharepoint/">


<FeatureSiteTemplateAssociation Id="4DEFA336-EDC4-43cb-9560-FE2E27E76DFB" TemplateName="SPSPERS#0"/></Elements>
In just a couple of seconds.  The styling is achieved using CSS.

Monday, 16 July 2007

SPS Site Template - Is it really obsolete?

Venkat Varkala discusses in his post whether the SPS site template is infact obsolete. In the webtempsps.xml you have the following:

<Template Name="SPS" ID="20">
<Configuration ID="0" Title="SharePoint Portal Server Site" Type="0" Hidden="TRUE" ImageUrl="../images/spshome.gif" Description="This template is obsolete."></Configuration>
</Template>
When Microsoft refer to this template being obselete they mean it's obselete from the create site template picker page and shouldn't be set to visible. The "SPS" folder is still an integral part of portal site creation.

The SPSPORTAL site template (declaration below) doesn't have a folder in the 12 Hive (under 12\template\sitetemplates). This could be classed as a virtual site definition.
<Template Name="SPSPORTAL" ID="47">
<Configuration ID="0" Title="Collaboration Portal" Type="0" Hidden="FALSE" ImageUrl="/_layouts/1033/images/template_corp_intranet.png" Description="A starter site hierarchy for an intranet divisional portal. It includes a home page, a News site, a Site Directory, a Document Center, and a Search Center with Tabs. Typically, this site has nearly as many contributors as readers and is used to host team sites." ProvisionAssembly="Microsoft.SharePoint.Publishing, Version=12.0.0.0, Culture=neutral, PublicKeyToken=71e9bce111e9429c" ProvisionClass="Microsoft.SharePoint.Publishing.PortalProvisioningProvider" ProvisionData="SiteTemplates\\WebManifest\\PortalWebManifest.xml" RootWebOnly="TRUE" DisplayCategory="Publishing" VisibilityFeatureDependency="97A2485F-EF4B-401f-9167-FA4FE177C6F6">
</Configuration>
</Template>
This template uses the files from the "SPS" folder when the site is created. The definition and structure of the site is defined by ther webmanifest.xml. The webmanifest.xml defines the Site Definition the virtual Site Template should be based on and what sub sites should be created.
<portal xmlns="PortalTemplate.xsd"><web name="Home" siteDefinition="SPS" displayName="$Resources:spscore,PortalManifest_Home_DisplayName;" description="$Resources:spscore,PortalManifest_Home_Description;">
<webs>
<web name="News" siteDefinition="SPSNHOME" displayName="$Resources:spscore,PortalManifest_News_DisplayName;" description="$Resources:spscore,PortalManifest_News_Description;" />
<web name="SiteDirectory" siteDefinition="SPSSITES" displayName="$Resources:spscore,PortalManifest_SiteDirectory_DisplayName;" description="$Resources:spscore,PortalManifest_SiteDirectory_Description;" />
<web name="SearchCenter" siteDefinition="SRCHCEN" displayName="$Resources:spscore,PortalManifest_SearchCenter_DisplayName;" description="$Resources:spscore,PortalManifest_SearchCenter_Description;" />
<web name="Docs" siteDefinition="BDR" displayName="$Resources:spscore,PortalManifest_DocumentCenter_DisplayName;" description="$Resources:spscore,PortalManifest_DocumentCenter_Description;" />
</webs>
</web>
</portal>
Sites are created this way so that they are built the "supported way". Microsoft also say that you shouldn't modify the MySite template on the file system, you should modify the template by using Feature Stapling (see the Microsoft post). Feature stapling involving creating:
  • A Staplee - This feature does the work. For example it could provision files in the MySite.
  • A Stapler - This feature activates the Staplee feature when a site of a particular site is created.

The following xml is an example of the feature.xml for a Stapler

<Elements xmlns="http://schemas.microsoft.com/sharepoint/">
<FeatureSiteTemplateAssociation Id="4DEFA336-EDC4-43cb-9560-FE2E27E76DFB" TemplateName="SPSPERS#0"/></Elements>

So when customising a portal template you should use feature stapling and site provisioning using the webmanifest.xml.

Friday, 13 July 2007

Hosting UserControls vs Delegate Control

There are two main approaches for adding user controls to your site:

  1. Deploying them to the "wpresources" folder
  2. Using the DelegateControl

Many people have blogged about each technique, but which is the best or the recommended approach?

Tony Rahbun has posted an article called "WebParticles: Developing and Using Web User Controls as WebParts in Microsoft Office SharePoint Server 2007" http://www.codeproject.com/spoint/WebParticles.asp.

Microsoft's recommended approach is to use the DelegateControl. http://msdn2.microsoft.com/en-us/library/ms463169.aspx.

Advantages of using the DelegateControl over hosting UserControls in the wpresources folder

  • Using Solution deployment in SharePoint 2007 you can create a WSP to automate the deployment of your UserControls (stored in the ControlTemplates folder) and Features (used to activate a DelegateControl).
  • You can control the scope of the feature.
  • More closely integrated with SharePoint.
  • If the feature isn't activated the DelegateControl will fall over gracefully. This would enable the component to be hidden if no longer needed.

Monday, 9 July 2007

SharePoint 2007 Backup Failed - Cannot open backup device

You may have seen this error Error: Object SharePoint_Config failed in event OnBackup. For more information, see the error log located in the backup directory. SqlException: Cannot open backup device '\\servername\backup\spbr0001\0000001.bak'. Operating system error 5(error not found).

After reading this article http://technet2.microsoft.com/Office/en-us/library/b4dfe06a-40a5-4826-8d4b-1d758a9e621a1033.mspx?mfr=true I resolved the issue. The steps I took were:

  • Set the SQL Server (MSSQLSERVER) Windows service to run as a domain account. Will require a restart of the service and IIS.
  • Setup sharing on the backup folder. Grant access for the identity that the Central Administration Application Pool runs under, the database SQL account, the identity that the Timer service runs under, to change and read rights.
  • On each of the SharePoint servers check you can access the share.
  • On each of the database servers check you can access the share.
  • Set the folder security, grant privledges for the identity that the Central Administration Application Pool runs under, the database SQL account, the identity that the Timer service runs under to all rights apart from Full Control.

This will fix backups that are performed using SharePoint 2007 Central Administration.

If you are running backups from STSADM you will need to grant access to the share and write access to the folder security for the user that runs the STSADM -o backup command.

Sunday, 8 July 2007

SharePoint 2007 Virtual Labs

Here's a list of SharePoint 2007 Virtual Labs

Thursday, 5 July 2007

STSADM Import / Export

STSADM has two operations called "import" and "export".

Export allows you to backup a copy of a site to the file system. This will generate one or more .CMP files (based on the size of the site, this will distribute the contents over many .CMP files).

Import allows you to take the files generated by an export and import over a blank SharePoint Site.

Please note: Both Import and Export operations for STSADM deal with an entire site. You can not export or import individual items such as lists or items.

I used Import / Export during a migration to restructure the sites. Basically I had a collection of WSS sites for active projects and a collection of WSS sites for archive projects which weren't logically organised. I wanted to introduce a level for the active projects and another level for the archive projects. I created these levels (active and archive) in SharePoint through the standard create site function. I then need to move the archived sites under archive and active under the active site. This process is often referred to a re-parenting. I did this using STSADM and the Export operation and the Import operation (see below).

STSADM -o export -url http://localhost/ProjectSite1 -filename c:\export\ProjectSite1 -includeusersecurity
STSADM -o createweb -url http://localhost/Archive/ProjectSite1
STSADM -o import -url http://localhost/Archive/ProjectSite1 -filename c:\export\ProjectSite1.cmp -includeusersecurity

Please note: By using the parameter "includeusersecurity" it preserves the current user, rights for the site. This is an optional parameter, but very useful.

The createweb operation creates a blank site for the import to write the contents of the export over. You shouldn't specify a sitetemplate as you just need a blank container (the template is defined in the export .CMP files).

STSADM is a command line tool, so you could wrap these commands in a batch file.

Please see my post about errors when using the Import / Export commands here.

Friday, 29 June 2007

SharePoint 2007 - MySite Self Service Site Creation

After setting up a new SharePoint 2007 installation an end user got the following error message when trying to create a new MySite "Your personal site cannot be created because Self-Service Site Creation is not enabled. Contact your site administrator for more information".

You can enabled Self Service Site Creation by

  • Open Central Administration
  • Click on the Application Management tab
  • Click on the Self-Service Site Management link
  • Click on the checkbox for "Enable Self-Service Site Creation" against the site collection hosting the MySites.

Thursday, 21 June 2007

Creating Content Types with the Content Types Viewer

This post shows how to create content types using the Content Types Viewer and features. In this post we are going to create a "car" content type with a "door", "engine" and "colour" site columns. This post assumes you are familiar with SharePoint 2007 administration.

The Content Types Viewer is available to download from http://www.codeplex.com/MOSS2K7CTypesViewer/

1. Once on your SharePoint 2007 site go to site settings and the site column gallery.

2. Create a new "doors" site column as a number attribute.


Tip: Always create new site columns or content types in a custom folder. This makes them easy to find and separates them from the out of the box ones.


3. Create a new "engine" site column as a string attribute.


4. Create a new "colour" site column as a choice attribute (add any colours for the choices).


5. Create a new "Car" content type inheriting from a list item.


6. Add the newly created site columns to the "Car" content type.


7. Run the Content Types View. Type in the URL of the site collection and click "GO".


8. Select the "Car" content type.


9. Click on the "Show Fields" button.


10. Create a new folder called "DemoSiteColumns" under C:\Program Files\Common Files\Microsoft Shared\Web Server Extensions\12\Template\Features\.

11. Create a new file called features.xml containing:
<Feature Id="F5E3FEE8-1D9B-4b95-848B-7614D638B90D" Title="Demo Site Columns" xmlns="http://schemas.microsoft.com/sharepoint/" Description="Enables the Demo Site Columns" version="1.0.0.0" scope="Site" hidden="FALSE">
<ElementManifests>
<ElementManifest Location="elements.xml">
</ElementManifests>
</Feature>

12. Create a new file called elements.xml.

13. Open elements.xml in notepad. Click on the "Copy to Clipboard" button from the Content Types Viewer.

14. Select edit > paste from the notepad window and save changes to the elements.xml file.

15. Click on the "Show Field Refs" button.


16. Create a new folder called "DemoContentType" under C:\Program Files\Common Files\Microsoft Shared\Web Server Extensions\12\Template\Features\

17. Create a new file called features.xml containing:
<Feature Id="3B4752E6-8D62-4df0-A4D3-31C8E99D44FC" Title="Demo Content Type" xmlns="http://schemas.microsoft.com/sharepoint/" Description="Enables the Demo Content Type" version="1.0.0.0" scope="Site" hidden="FALSE">
<ElementManifests>
<ElementManifest Location="elements.xml">
</ElementManifests>
</Feature>

18. Create a new file called elements.xml.

19. Open elements.xml in notepad. Click on the "Copy to Clipboard" button from the Content Types Viewer.

20. Select edit > paste from the notepad window and save changes to the elements.xml file.

21. Open a command prompt and type the following:

CD C:\Program Files\Common Files\Microsoft Shared\Web Server Extensions\12\bin
stsadm -o installfeature -file DemoSiteColumnsstsadm -o installfeature -file DemoContentType

22. Before activating the features either delete the existing site columns and content types or activate the features in a different site collection.

23. Go back to the command prompt and type the following:

stsadm -o activatefeature -file DemoSiteColumns -url http://localhost/
stsadm -o activatefeature -file DemoContentType -url http://localhost/

You have now created two features which create the site columns and the "Car" content type.

Tuesday, 19 June 2007

Using the Content Types Viewer

The content types viewer is a windows form which displays information about content types that exist in SharePoint 2007. I came to write the tool because creating custom content types using features was quite time consuming. Creating content types with a web browser is more intuitive but there is no easy way to deploy them. The content types viewer looks like:


Download it here http://www.codeplex.com/MOSS2K7CTypesViewer/

How to use the content types viewer

  1. Type in the url of the site collection where the content types are. Then click on "GO".
  2. Select a content type from the list of content types displayed.
  3. You have 3 choices. You can view the schema of the content type by clicking "Show Schema". You can also view the fields (the xml displayed is used for features that create site columns) by clicking "Show Fields" and field refs (the xml displayed is used for features that create content types) by clicking "Show Field Refs".

Show Schema example:


Show Fields example:


Show Field Refs example:


Comming soon ... creating content types with the Content Types Viewer.

Updated: Creating content types with the Content Types Viewer

Tip: Creating content types in SharePoint 2007

When creating content types try and think generically. One great feature of content types is that they support inheritance. If you have an object for example a car, create a base car content type that contains all the common attributes that a car supports (doors, engine, colour etc) and then create a content type based on the car content type.

For example: Content types that inherit from the car would be convertible and 4x4.


By using this approach you can add common items to the car content type and they will get added to content types that inherit from the car content type. You could then add unique attributes to each of the child content types (convertible and 4x4).


Wednesday, 13 June 2007

SPS 2003 upgrade to MOSS 2007

I’ve successfully completed several migrations from SharePoint 2003 to MOSS 2007 with sites that have had various degrees of customisations. Mainly these have used the database migration approach. This was due to minimising the amount of downtime and to new hardware requirements.

Microsoft have whitepapers and information on technet for upgrading to SharePoint 2007, for more information go here http://technet2.microsoft.com/Office/en-us/library/601874ea-86c9-4611-bdaf-abe17bbb68161033.mspx?mfr=true

Planning is definitely the most important stage of the upgrade process. You need to choose the correct approach. The approach maybe obvious but you need to weigh up the pros and cons of each approach before deciding.

Choosing the upgrade approach http://technet2.microsoft.com/Office/en-us/library/53b8a28b-43c4-43aa-8854-d72d9b7b59c41033.mspx?mfr=true

Using the database migration I was able to stagger the upgrade for each of the site collections, so that user acceptance testing can be carried out and the migrated site approved by the stake holders. This also meant I was in full control of what content was to be migrated and at which point in time, reducing the impact on the end users.

One of the issues with the database migration is that you are actually adding the old SharePoint 2003 content database within the new SharePoint 2007 web application. This means you will now have two content databases for each site collection you migrate. You can specify site limits on the content databases in central administration so that the new sites will use the new database, but you will still have two databases to backup and manage etc.

The diagram below illustrates the normal process.


A way around this is to migrate the SharePoint 2003 site collection to a temporary web application. Once this has been completed and the target audience are happy the content has come across you can then setup content deployment to push the content from the temporary web application to the new site.

The diagram below illustrates this process.


Hope you find this useful.

Tuesday, 12 June 2007

STSADM Import / Export

Tip: When exporting a site in SharePoint 2007 using STSADM, you may get a .CMP file 17KB in size. This will be because the user who is running STSADM doesn't have access to the site. If you give the user permissions to the site, you will export the site successfully.

Always run STSADM as a user with a site collection owner rights on the target site.

MOSS Variations … Alternative approach

Variations in SharePoint 2007 work well if you have direct translations from one main language into one or many languages, but if you want a more flexible solution to cater for having pages in other languages but not the source language then you can’t do that with the out-of-the-box approach.

For example, under the standard approach:

A global company has a multi-lingual website with content predominately in English. I setup my source variation as EN (English). I also create FR (French) and DE (German) variation labels. I create a page under EN and submit to FR and / or DE.


* User creates a page in the English site.


* User submits the variations of the page into the French and German sites.


* User can create pages in both the French and German sites, but this is regionalised content and cannot be translated using variations


The company has a page targeted at French and German visitors only. The normal process is to create a page in the source variation (in the above example this is "EN") and submit to a number of variations, but in this case I don’t want it to appear in English.

A solution would be to:


  1. Create the source variation label as a neutral label ie called “CMS”.
  2. Click on create hierarchies and build the site structure as you did before.
  3. Create a variation label for each of the desired languages.
  4. Click on create hierarchies.

You can now create a page in the “CMS” section and submit to French and German. The out-of-the-box multi-lingual switching control and landing page functionality will need to change in order to hide the “CMS” variation from the menu and landing logic. This approach is similar to the multi-lingual concept of master and slave sites in MCMS 2002.